
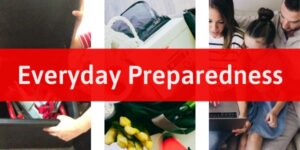
Everyday Preparedness: Simple Systems to Make Life Easier
Everyday Preparedness:Simple Systems to Make Life Easier **This post contains affiliate links, which means if you click on a link and make a purchase, I
**This post contains affiliate links, which means if you click on a link and make a purchase, I may make a small commission at no extra cost to you.
I have 4 kids. My husband has 3. I am a total germaphobe with OCD. These 3 facts combine to make an unfortunate situation during the months of October-March…And a few times in between.
I know a thing or two about keeping germs contained; my brain just works that way naturally. It’s like I was born to avoid germs. Some people are born to invent cutting-edge technology or find a cure for cancer. I am convinced I was born to think of all the possible ways germs can be shared, and educate my kids and all their friends about all the ways. And drink Dr. Pepper. I was also born to do that.
I am going to go easy on you today. I am only going to cover a very small fraction of the things I do to cut down on the spread of germs within the walls of my own home. I won’t mention things like how I Clorox (yes – “to Clorox” is a verb) the bottles of medicine I get from the pharmacy because those pharmacists have touched sick people’s hands and credit cards and pens they’ve used, etc.
I won’t tell you the over-the-top things I do like that. But I WILL share 11 things even normal, non-OCD germaphobes can do to keep the germs from running wild and to keep the puke clean-up to a minimum. I also won’t insult you by suggesting that everyone wash their hands and cough into their arm rather than their hands and things like that. I promised absolutely genius ideas, so I am avoiding the obvious today.
**Be sure to go all the way to the end of the post to get your free printable!**
I don’t care what you use. But line those puppies. I don’t think I need to explain this one. Just do it. I love the idea of using a Ziploc, but I don’t love the actual opening size of even a gallon-sized Ziploc bag. It’s not big enough to line a bowl, and I don’t want my kids to miss! I also don’t want to stress them out like they have to aim for a super small target when they’re puking. I mean, puking is bad enough without adding pressure to aim their puke accurately, right? So I just use a grocery bag to line a large bowl. The one in this picture is from my favorite place to eat on the planet … Rubio’s. I hate to use such an epic bag for puke, but…it’s a nice size and it doesn’t have any holes in it, so it’s kind of perfect.
If you live in California like me, you either have NO bags because you are super responsible and do your part to save the earth and use reusable bags, OR, you have a ton of super thick, high-quality bags that you have to pay 10 cents for every time you go to any store that sells food (cue eye roll here). You can tell which kind I am. I have liners for barf bowls for the next few decades. The good kind, without holes at the bottom. Just make sure whatever you use doesn’t have any holes in it!
Also, keep a few paper towels next to the barf bowl for the barfer to wipe his mouth on. Paper towels are better than real towels that you have to wash. I’m just sayin’…
This way if someone doesn’t make it all the way in the barf bowl, you aren’t stuck cleaning carpet or mattresses. I have always just used doubled up beach towels for this purpose. But I think I may try these puppy pads this winter.
I think it would be really nice to have something disposable. When someone is sick in the house, the washer and dryer are constantly running with towels and bedding. I think it would be worth the $20 to get a 40-pack of these and eliminate the laundry!
This makes it so easy to keep pillowcases fresh. I like to put 4 or 5 pillowcases on the sick person’s pillow, and then just take the outer one (or two, if they are thin) off to freshen it up, without having to scramble for a new one if it gets puke, snot, etc on it. It just makes things easier and more convenient. And it saves the pillow from being destroyed if things get messy…
I don’t mean don’t share toothbrushes. I don’t think many people typically share their toothbrushes. What I am referring to is, don’t store your toothbrushes all in the same toothbrush holder. Talk about a germ fest! I mean, think about it. You don’t want a sick kid coughing on you, but you’ll stick your toothbrush in the same cup as theirs? Might as well let that sick kid cough straight into your MOUTH! GROSS! Separate those bad boys.
The same goes for toothpaste. Unless you use a freshly washed finger to squeeze your toothpaste onto, and then transfer it to your toothbrush, your toothpaste tube has just as many germs on it as your toothbrush does. You wipe your toothbrush bristles (yes – the same ones that clean your teeth and tongue!) on that tube of toothpaste to capture the toothpaste. Again…if you’re going to share toothpaste tubes, just have everyone cough into everyone’s mouths and call it a day! Ugh.
If this is something you’d like to implement in your home but haven’t yet, I have two easy ways to do this.
In our old house, we used Crystal Light containers. All the kids had their own container to put their floss, toothpaste, toothbrush, and tooth timer in. (Sidenote…if you don’t have tooth timers, here is a link to the ones we have. They are super cheap – less than $1 a piece. There’s no fighting over how long your kids brush their teeth – they flip it and brush til the sand runs out. Highly recommend). Their fluoride just sat next to their Crystal Light containers in the medicine cabinet. Here are a few reasons I like Crystal Light containers to house teeth stuff.
I wish we still had a medicine cabinet so I could show you a picture of how nicely they all fit in one, but this house didn’t come with medicine cabinets. What kind of BRAND NEW HOUSE doesn’t come with MEDICINE CABINETS in the bathrooms?! That was one of those things that we didn’t even notice until we were moving in. I did a mad dash around the house to all 3 bathrooms and, nope. Not one in the whole house. Freaking Californian homebuilders.
ANYWAY…the second option…
This little contraption is genius and it’s a good price.
**Note that only one container comes with the set in this link. You have to purchase more of the containers if you want more than one. It’s the same at Ikea, so don’t feel like Amazon is a rip-off**
They have a much fancier option, which I LOVE, but we went with the cheaper plastic option for kids’ bathrooms. If you are dealing with older people who don’t run the risk of dropping these, you may want to consider this set. It also only comes with one caddy, so you’d have to purchase additional caddies on top of this set, FYI.
This is another thing most people don’t think about. They (and their kids) wipe their mouths on the handtowel in the bathroom after brushing their teeth and go on their way. That hand towel is to wipe CLEAN hands on, after washing your hands with SOAP. What’s the point of washing your hands if you are just going to rub them all over a towel with someone’s mouth germs on it?!
Two solutions:
Soon after Tyler and I were married, I was looking for a solution to this problem. With 7 kids in the house, it made for a lot of germs floating around. Every time the kids brushed their teeth, I would cringe, knowing they were all wiping their mouths on the same hand towel. I saw these embroidered hand towels at Target and bought all the ones they had that matched first letter of the names of the kids on them. We have 3 boys whose names start with “C,” so I got a snowflake one to differentiate. It worked…
Target doesn’t have any more of the exact kind I got, but these are available in some of the letters now…
These ones on Amazon are similar to the ones I got at Target.
Buy a couple packs of baby washcloths; they are perfect for wiping mouths after brushing teeth! I have a bunch of them just thrown in the top drawer that’s too small to fit anything else in anyway. I don’t even fold them. I just throw them in the drawer, and bam. We have a week’s supply of mouth-wiping mini washcloths.
After brushing teeth, each kid grabs one, wipes her mouth, and throws it in the laundry room. I should mention I only have these in the bathroom that’s right next to the laundry room. Anyway, this is a cheap, easy, logical solution for everyone to keep their teeth-brushing-germs to themselves.
This is a very visual reminder to everyone that this spot is for sick germs only. None of the non-sick people are allowed to sit/lay here. It also makes me feel better knowing that the hot little feverish body isn’t snuggling right into the same place on the couch that a healthy kid will be snuggling into 5 minutes later.
The comforter is washable. The couch is not so much. I love pulling this blanket off at the end of the day and throwing it in the washer, and not feeling like my couch is contaminated.
Did you know that the surface you are wanting to disinfect needs to stay wet for 4 minutes with Clorox wipes? Be sure to read labels on things you think are killing germs.
Use the SANITARY cycle if you have it. I may go a little overboard here, but I try to wash the bedding and towels of the sick person every day. If you have an extra comforter/blanket you can throw over their normal bedding, that makes it tons easier.
Kind of like the pillowcase idea in #3…just peel off the top layer of bedding and you have a fresh one underneath. That way you aren’t having to put fitted sheets and flat sheets back on every time. Just throw a comforter on top of all of that and let that be the new bottom layer.
Let those germs fly!
Don’t just open one window. Make sure you open multiple windows to really get the air circulating. Even better to point fans toward the window.
If you are wondering how you are going to remember all of this, I got you. Below you will find a free printable to tape to the inside of your medicine cupboard (don’t print from the picture – print from the PDF link below the picture). At the bottom of the printable is the list of one-time things you may want to consider doing/getting. Once figured out/purchased, you won’t need to worry about them anymore, so go ahead and cut the bottom strip off before taping it to your medicine cupboard door.
Be sure to check the “Things to Have On-Hand” list every few months to make sure you always have those things in case anyone turns up sick.
Get your printable PDF HERE.
**This printable is absolutely free! All I ask for is a kind follow on Instagram / Facebook / Pinterest or a share/pin of this post. Also, don’t forget to subscribe by filling out the form below this post. Thank you for your support!**
What tips and tricks do you use when your kids (or YOU) are sick? Email me at melanie@planforawesome.com
Everyday Preparedness:Simple Systems to Make Life Easier **This post contains affiliate links, which means if you click on a link and make a purchase, I
In order to prepare kids for emergencies, you first need to tackle the obvious – disaster anxiety is real! This post addresses that and gives you resources to help teach your kids about preparedness without scaring them.
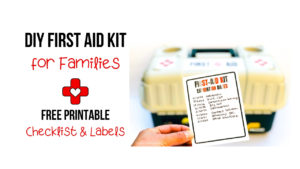
Comprehensive list of things to include in your DIY first aid kit. This article explains why, includes helpful links, and compares different products.