Simplify Your Family's Emergency Preparedness

Prepare for an Earthquake:

11 Things to do now

road damaged from an earthquake.

**This post contains affiliate links, which means if you click on a link and make a purchase, I may make a small commission at no extra cost to you.

Considering how to prepare for an earthquake is so important! There are things you can do to prepare your home for an earthquake, as well as to prepare your family for an earthquake.


They can happen anywhere, but the higher risk areas in the United States are California, Alaska, and the Mississippi Valley. Living in California, I am especially in tune with this possibility, and thought it would be helpful to cover this topic?

1. Identify things in your home that need to be secured

Pictures

This step has a two-fold benefit.  Not only will it reduce the risk of having things break and costing you a fortune in replacing broken items, but it will also reduce the risk of injury to your family.  Imagine all of your picture frames in your entire house crashing down during an earthquake; it could mean lots of money and possible injuries from falling objects and broken glass.


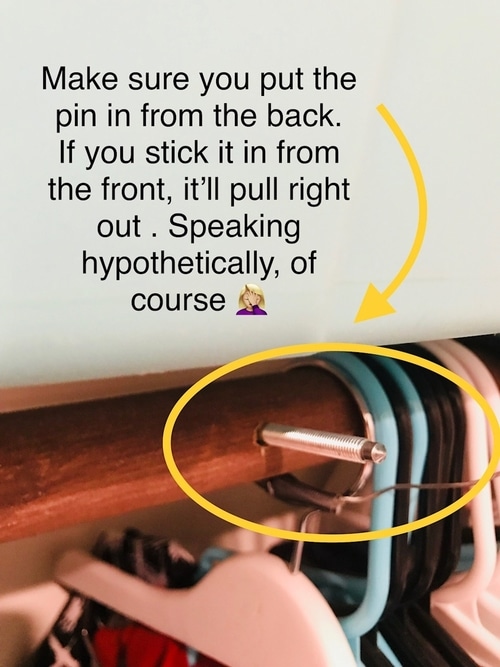
Hanging a picture frame on one nail isn’t going to hold it in place during a massive earthquake.


There are two different methods for securing picture frames to your walls.


  1. Use sticky putty (affiliate link) in addition to how they are already hanging.  This stuff really is awesome.  It can help secure something that is already hung by helping it stay still and attached to the surface of your wall.  **Added perk: this also prevents your frames from tilting when someone slams a door, or when a Nerf bullet hits it.  I am speaking hypothetically, of course.**  **Disclaimer: this DOES leave a residue/mark on your wall.  I would only recommend using this on pictures that you plan on leaving up for a long time.  However, it is totally worth it, because you’ll have to fill a nail hole if you ever take the picture down, and you can cover the mark this leaves with the touchup paint at the same time.  Just wanted you to be aware.
  2. The second is for the bigger/heavier items.  You really should anchor those puppies down.  This website is an excellent source for instructions on doing this.  You can also purchase the hardware for it on their website, or similar hardware (affiliate link) can be found on Amazon as well.  I just like how the hotelart website gives pictures with their step-by-step instructions.

Televisions

For a few bucks, you can purchase one of a variety of TV straps.  These attach to the back of your TV and secure it to either the wall or your TV stand.  Here are straps that stick on (affiliate link), and these ones screw on (affiliate link) to the back of your TV.


**Added perk: this also prevents TVs from being pulled on top of small children.  Did you know that every 24 minutes tipped furniture or a falling TV sends an injured child to the emergency room?  Secure them!

Refrigerators

Refrigerators should also be secured to the wall behind them.


  1. The quickest and easiest way is a kit like this(affiliate link), found on Amazon.  You peel and stick, and you’re done.  This is also the more expensive option.
  2. Earthquakecountry.org is an excellent resource and shows how to use angle brackets or pronged zee clips to secure refrigerators.

Bookcases, Hutches, Armoires, and all other tall furniture

Can you imagine if a bookcase fell on top of your child during an earthquake?  Secure them!  Each piece of large furniture should be secured to two different wall studs.  Depending on size and weight, here are some different options:


  • Wood Screws
  • Kit with Nylon Strapping
  • L-Brackets and Lag Screws

Things in cupboards

Okay, I am not so crazy that I plan on running out and buying latching cabinets just in case we have an earthquake.  If you already have them, kudos to you.  I guess I am willing to take my chances on that one.


However, it isn’t a bad idea to line your cabinets with rubberized shelf mats (affiliate link) to help prevent items from slipping in the event of an earthquake.  You can get these at hardware stores as well as recreational vehicle or boating equipment supply stores.

Other options are metal edge angles on shelves or net restraints.

Things on open shelves

If you have things on display that would be dangerous as flying objects, or be a big emotional loss if they broke (such as family heirlooms), consider securing them in place with museum putty found on Amazon here (affiliate link).  This is not intended for vertical use.  It is meant to keep things from sliding on a horizontal surface (also used a lot by people with motorhomes to keep things in place).

Water Heater

If your water heater doesn’t have two straps that wrap completely around it and are screwed into the studs of a wall, then it is not properly braced.  The old recommendations have been modified since the 1989 Loma Prieta (San Francisco) earthquake and the 1994 Northridge (LA) earthquake.


It is now recommended that there be a strap on the bottom and a strap along the top, rather than just one around the top or middle.


It is also recommended that you use heavy-gauge metal strapping rather than plumber’s tape (the thin metal in plumber’s tape is too brittle to be effective).


You may need to add wood blocking to your wall to provide a place for the straps to be screwed into.


  • Purchase and install a strap kit or bracing kit
  • Have a licensed plumber strap your water heater according to code

Be sure to check the straps once a year.  They may become loose over time.

2. Hang pictures and mirrors away from Beds

This prevents these things from falling on top of people who might be sleeping when an earthquake happens.

3. Store heavy and breakable items on low shelves

glass jars in a pantry bin so they don't break during an earthquake.

This one can be hard, but the more mindful you are of it, the better off you’ll be.


For example, I put all glass jars of food (spaghetti sauce, jelly, fudge, caramel, etc) on the bottom shelf in our pantry.  This gets tricky if you have a toddler…you want to make sure all glass is out of reach for a toddler, or secured behind childproofed cupboard doors.


Since we are past the toddler stage, I put our glass jars in a plastic bin (affiliate link)and put that on the bottom shelf in our pantry.  This way if there were an earthquake, even if the entire bin fell off the shelf, it’s not a far fall and the bin would hopefully minimize the mess of fallen broken glass jars.  It’s definitely better than putting all these glass jars on a top shelf with no bin…

**Also, an added perk: before I started doing this, every once in a while a glass jar in the pantry would get knocked over by accident.  These plastic bins eliminate that!


Heavy things are another tough one.  I like to utilize every square inch in our home for storage.  I like using Sterilite/Rubbermaid totes to keep things organized, and there is a TON of space above the top shelf in our master closet.  Which makes that a pretty perfect place to store a bunch of totes.


The problem is, the shelf isn’t as deep as my totes.  So every once in a while, we would hear a HUGE CRASH come from upstairs, and Tyler and I would look at each other and roll our eyes.  We knew it was one of the totes up in the master closet, falling off the shelf.


This is a HUGE safety hazard (not to mention a huge pain in the butt)!  So Tyler rigged up this system for me.  It isn’t pretty, and one day maybe we’ll come up with something better.  But it was a quick fix that works, so I’m not complaining.  Don’t judge.  I wouldn’t put this out in my living room or anything.  But if you are facing the same problem, I would recommend doing something like this, to make it a safer situation.


Those totes aren’t going ANYWHERE.  Trust me.


If you don’t have a crazy handy and creative husband to do this for you, do all you can to move those heavy things down as low as possible.

4. Identify a safe place in every room of the house to go to during an earthquake

What makes a safe place? 


  • Away from windows
  • Away from things hanging on the wall or ceiling
  • If there is a sturdy piece of furniture to hide under (like a desk), that is best!

This is where my kids know to go if they are in our living room when an earthquake strikes.  This desk is solid wood, so I’m not worried about it collapsing on top of them.  To have protection on 3 sides is amazing!  They just need to throw the stool out of the way and take cover!

5. Practice Stop, Drop, and Hold On!

  • If inside, STAY INSIDE until the shaking stops
  • Drop to your hands and knees
  • Cover your head and neck with your arms
  • Hold on to sturdy furniture until the shaking stops
  • Crawl only as far as you need to, to get out of the way of falling items
  • If in bed, stay there and curl up and cover your neck and head with a pillow
  • Do not get in a doorway.  This has changed!  When I was a kid, that was a place we were specifically taught to go to.  Not anymore!  Doorways are no stronger than any other part of a structure, so don’t rely on them for protection.  Instead, get under a sturdy piece of furniture!
  • If you smell gas, get out!
  • If outside, stay outside.  Get as far away from buildings, trees, streetlights, and power lines as possible.
  • If in a vehicle, pull over to a clear area that is not near buildings, overpasses, underpasses, utility wires, or tall trees.  If a power line falls on your vehicle, don’t get out.  Wait for assistance.
  • If in a multi-level building, expect fire alarms and sprinklers to go off.  Do not use elevators.
  • If near slopes, cliffs or mountains, expect falling rocks and landslides

FEMA has an excellent an excellent printable information sheet, if you click here and then scroll down to the first link under “TIP SHEETS.” 

6. Have a Family Emergency Plan

Wiped out cell towers can drastically affect the ability to communicate.  Click here to read the post all about creating your Family Emergency Plan.

7. Know how to shut off your utilities

Broken gas lines can create a hazard requiring immediate shut-off and/or evacuation.

It is ESSENTIAL for you to know how to shut off your gas (and water).  If you’d like me to walk you through step-by-step to shutting off your gas and water, finding a utility shut-off tool that fits, along with a free printable to hang in your garage with instructions, you’ll want to check out the Quick & Easy Preparedness Challenge.  

utility shutoff on exterior of house.

8. Have 72-hour kits

If your home is unsafe following an earthquake, you will need to evacuate.  Having 72-hour kits and grab lists ready to go are sooooo important!


Need Help with 72-Hour Kits?


Blog Posts

I have a 5-part series to help you get your 72-Hour Kits ready to go.  Click here to go to Part 1 of Building Your 72-Hour Kits.

If you haven’t started making 72-hour kits for your family, here is a post outlining a 16-week schedule to building your kits!


Video Course with Printable Curriculum

If you’d like more help than blog posts, I cannot recommend the Plan for Awesome 72-Hour Kit Course enough!  It is overflowing with budget tips, kid hacks, and helpful questions to help you personalize your kits!  You can listen while you’re doing laundry, dishes, or driving carpool.  It comes complete with supporting printables, making it a ONE-STOP-SHOP for building your family’s 72-hour kits.

You can purchase the course outright HERE, or you can access it for a FRACTION of the price by joining the Plan for Awesome Premium membership!

kids in a family wearing their 72-hour kit backpacks.

9. Prepare for a long-term power outage

Downed power lines can result in loss of power for an extended amount of time (several days and even weeks).

This post has a comprehensive list of things to consider in the event of an extended power outage.

10. Have a supply of food and water in your home

Broken roads and bridges can result in a major delay in food and supplies reaching your area for days, weeks, and even months, depending on the damage. 


Having several weeks’ worth of food and water in your home would be an incredible resource to have if this were the case in your area.

11. Consider obtaining an earthquake insurance policy

Standard homeowner’s insurance does not cover earthquake damage.  For reals.  Why do we even have insurance, with all the exclusions?!  Don’t get me started!


Many people are surprised to learn that earthquake damage is not included in a standard homeowner’s insurance policy.  Now that you know, decide if purchasing earthquake coverage is for you.  You can call your current homeowner’s insurance company for a quote.  I will warn you…the coverage is hugely disappointing.  But it’s something…

Related Posts:

hands holding a sign.

5 simple things you can do to get your family prepared if you don't have thousands of dollars or hundreds of hours

Receive EXCLUSIVE SUBSCRIBER-ONLY FREE PRINTABLES, INCLUDING "THIS OR THAT EMERGENCY PREPAREDNESS," with 5 things that take 15 minutes or less!

hands holding a sign.

This website uses cookies to ensure you get the best experience.