

How to Get an Emergency Supply of Medication for Preparedness Purposes
How to get an emergency supply of medication without a prescription. Jace is a great way to keep medicine for your family in your emergency preparedness plan.

**This post contains affiliate links, which means if you click on a link and make a purchase, I may make a small commission at no extra cost to you.
It’s time! It’s time to tackle this beast head-on and GET! IT! DONE!
We are starting AT THE VERY BEGINNING, but that doesn’t mean this is only 72-hour kits for beginners. Even if you have complete 72-hour kits, I am still confident you will find ways to improve the efficiency of your existing kits by going through these next few posts.
I thought I’d share my plan of attack with you, just so you have a heads up on what we will be covering over the next several weeks.
Part 1 – 72-hour kits – GENERAL TIPS and WHAT TO PACK IN. This post is taking care of all the general random tips for putting these kits together. It’s basically the PRE-POST.
Part 2 – 72-hour kits for ADULTS
Part 3 – 72-hour kits for KIDS / BABIES
Part 4 – 72-hour kits for PETS
Part 5 – 72-hour kits – GRAB LIST
Part 6 – A 16-Week Printable Schedule to Actually Finish Your Family’s 72-Hour Kits
Part 7 – 72-hour kits – FIRST AID
Part 8 – 72-hour kits for NEWLYWEDS
So here we go with Part 1 – all the random 72-hour kit tips and figuring out what to pack your kits in.
A note before you get started here: If you want a step-by-step guide that walks you through every single step of building your 72-hour kits, from preparing a functional space to store your 72-hour kits, all the way through to a rotation guide for when they’re done, click here. This is a COMPLETE GUIDE to 72-Hour Kits for families.
And when I say complete, I mean COM-PLETE! It is kind of insane how much I put into this thing. No more having to come back to the website, or subscribing and finding your free printables in the resource library, and clicking around the website. This is ALL in one spot. One PDF file with all the kid tips, budget tips, pretty much every tip/hack imaginable with 72-hour kits. It comes with 25 supporting printables that are updated and amazing. This guide takes you through all of the steps in the schedule I outlined above, and more. Much more.

The point is to have these kits ready to go at a moment’s notice. You are going to have to spend some money and buy doubles of the things you want in your kits. It’s a small price to pay should you ever need to use it.
Don’t check something off your list just because you have it somewhere in your house or garage. These things need to be packed and ready to go. AT ALL TIMES. There are a few exceptions to this, and we will get to those in a couple weeks. Those are what we will put on the “GRAB LIST.” But you can’t put everything on a grab list. That’s the point of having a ready-to-go bag. The Grab List is reserved for things that are not feasible to buy extras of.
Bottom line: splurge and buy a separate toothpaste for your bag. Don’t plan to throw something like that in last-minute.
It doesn’t make sense to buy top-of-the-line items. There is a good chance you will never have to use these kits, and even if you do, you aren’t going to care what brand of shirt you are wearing, or how cool your backpack is. You will just be grateful to be alive. So be smart about what you spend your money on.
I’m usually all about quality, but this is one time where quality isn’t necessarily in your best interest. Having said that, you DO need to make sure you get things that will actually work (like a can opener – don’t be cheap on that, because if that doesn’t work, you’re gonna really regret skimping on that item) … just be smart about it.
Batteries will get corroded and ruin things! Do not store batteries IN the item they are needed for. Especially for something inside a 72-hour kit that could very well sit untouched for several years. If not stored properly, batteries can get corroded and ruin things, or even worse, create a spark. There are a few ways to pack batteries long-term, to protect the exposed terminals from contact.
However you pack your batteries, I recommend putting them inside the Ziploc bag that contains the item that requires those specific batteries (or tape the battery bag directly to the item). That way you aren’t searching for batteries – they are all right there together with the item that needs them.
Another option is to store all your batteries in a Battery Daddy (affiliate link). This is one of my favorite organization tools ever! We use this daily in our home, and I finally decided to keep it in our Preparedness Closet, so we can snag it along with our kits if we ever need to evacuate.
Also, pay attention to whether a screwdriver is needed to open the battery compartment. If so, be sure to pack a screwdriver with the appropriate tip! Learn more about battery safety, by checking out this blog post.
Obviously, a baby isn’t going to need a lot of the items you would pack for an adult. I decided to include most of the items for ALL members of my family, regardless of age. That way we all had the same things, and I didn’t have to add things later on. I preferred to get it all done at the same time. That was my choice – just something to think about.
For example: everyone has a small amount of cash and some quarters in their backpacks. I put this in all the backpacks, including the baby I had at the time, and now that he is 6, it’s already taken care of.
These can be expensive and overwhelming to try to put together all at once. If you can’t do it all right now, that’s okay. Start with what you have and go from there. Anything is better than nothing.
Having said that, you don’t want these things to lay around half-finished for the rest of your life. Make a goal to start AND FINISH these.
Depending on how big your family is and how much money/time you have, you may want to break this up into several weeks or months.
If money is an issue, assign a specific dollar amount you can budget each month for these until they are completed.
Consider asking for money/certain components of 72-hour kits for birthday, anniversary, and Christmas gifts. Let this be the year you get your home and family prepared for emergencies. While these may not be as exciting as all the other Christmas gifts you planned on getting this year, I can’t think of many other things that are more important.
I realize I was a total nerd (and still am), but I really think I would have loved getting a 72-hour kit for Christmas as a kid. It’s something to think about…
You could at least give parts of these kits to your kids as gifts, and they could even get excited about it! Like these Survival Whistles (affiliate link). I mean, those are cool!
If you are one person, organizing is less complicated. If you have a large family, things get a little trickier.
There is no right or wrong way to pack these things. Well, I take that back. I think there are probably several ways that could be considered “wrong,” or, a terrible idea. But there are lots of ways that make sense, depending on individual situations.
After going back and forth a number of times, I settled on packing each person’s things individually in their own separate backpacks and then having a couple family bags with the bulk of the food, water, and some other supplies.
I liked the idea of having everyone’s things grouped together because in my head I pictured being evacuated together and being able to stay together the entire time. But since the very nature of this type of event is so variable and unknown, I decided that packing each person up individually was probably smarter and would handle more scenarios with less chaos. This way if we need to separate for any amount of time, we don’t have to re-pack everything.
Of course, there are some shared supplies, but at least most of the personal items are already organized by person.

…and load them into your car. If you are the only one home when disaster strikes, you need to be able to get everything into your car on your own. This might sound like a lame tip, but trust me…some people don’t think about that until it’s too late. They pack up the whole family in one gigantic container or trashcan, and then they have to empty it all out in order to lift it into their car.
These are great because they don’t require hands to transport them. I would recommend assigning a backpack to everyone in the family who is old enough to wear one. Once you are finished putting these “kits” together, you will realize you have a ton of stuff, and having some of it in backpacks makes it more manageable to transport.
Wheels are great, so these are great options. Since you don’t have to worry about being overweight for an airline here, rolling duffel bags hold a TON and can fit odd-shaped things. So if I were buying luggage for the sole purpose of packing a 72-hour kit, I would go for the rolling duffel like this.(affiliate link) In fact, I have this exact one. It’s massive. It’s perfect. Just remember to not make it heavier than you can lift.
Sterilite or Rubbermaid type totes work great. I like the 45-gallon sized ones with wheels. They are less than $20 at Target. It won’t let me link to them because they aren’t available to ship, but you can find them in the store. And the ones on Amazon are outrageously priced, so just go to Target or Walmart if you like this option.
These aren’t a bad idea. However, they are a little less user-friendly as far as loading them into your car, so make sure you have a plan for that; not only being able to lift it into your car, but also having room to fit a huge trashcan (plus all your kids/pets).
If you are short on money and need to spend the money that you do have on the actual stuff you would need, you can always pack in garbage sacks. They aren’t ideal, but they work in a pinch. Just be mindful to not pack them too heavy, for two reasons:
Throw a post out on Facebook and ask if anyone has any old backpacks they aren’t using anymore. Visit a facebook garage sale page. Go to a thrift store or garage sale. You can be creative and save money on this part if you are on a tight budget!
Okay, I think those are all the general tips I have for 72-hour kits. Your tasks this week:
Get those things ready and come back for PART 2, which covers a comprehensive list of things to pack in a 72-hour kit for adults. ♥
And remember, if you want a step-by-step guide that walks you through every single step of building your 72-hour kits, from preparing a functional space to store your 72-hour kits, all the way through to a rotation guide for when they’re done, click here. This is a comprehensive course on 72-Hour Kits for families.
How to get an emergency supply of medication without a prescription. Jace is a great way to keep medicine for your family in your emergency preparedness plan.
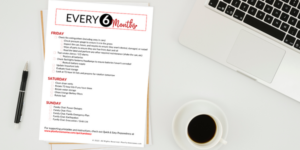
Why you should schedule an emergency preparedness weekend every 6 months, and what you should be doing, reviewing, rotating, and maintaining. Free printable checklist!
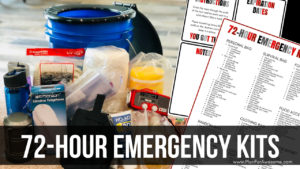
This is such an awesome post for putting together 72-hour emergency kits for adults! What everyone should have and how to personalize your adult 72-hour kit.
