Simplify Your Family's Emergency Preparedness

72-hour emergency kits for adults

72-hour kits for beginners - Part 2

72-Hour Kits: A Printable Schedule to Actually Finish Them! If you are totally overwhelmed by putting together 72-hour emergency kits for your family, this website is gold! It provides a free printable, step-by-step, organized way to start and actually finish your family's 72-hour kits! -PlanForAwesome

**This post contains affiliate links, which means if you click on a link and make a purchase, I may make a small commission at no extra cost to you.

These emergency kits for adults can be overwhelming if you are starting from scratch. Don’t get discouraged. The printables at the bottom of this post will help keep you organized. Print them out and chip away at this as quickly or as slowly as time and money allow.


Remember: SOMETHING is better than NOTHING. Start today. Cross things out as you accumulate them, so you can easily see what you have already gathered, and what items still remain.


**THIS IS NOT A MANDATORY LIST! Use this as a guide; think of this project as personalized preparedness. Start with the most important things, and feel free to cross anything off the list that you don’t want in your pack. No 2 packs are exactly alike. **


If you want a step-by-step guide that walks you through every single step of building your 72-hour kits, from preparing a functional space to store your 72-hour kits, all the way through to a rotation guide for when they’re done, click hereThis is a COMPLETE GUIDE to 72-Hour Kits for families. And when I say complete, I mean COM-PLETE!


It is kind of insane how much I put into this thing. This is ALL in one spot. One PDF with all the kid tips, budget tips, pretty much every tip/hack imaginable with 72-hour kits. It comes with 25 supporting printables that are updated and amazing. 

Don't want to keep reading through every single blog post to complete your 72-hour emergency kits? Simply click the red button below!

KEeping emergency kit items organized

Don’t forget to jot down expiration dates as you pack things. There is a handy printable at the bottom of the post for you to track expiration dates.


Do your best to put things that have an expiration date toward the top of the bag. That will make rotating things much easier and more convenient.


HERE (affiliate link) is my favorite pack to pack these in. It is a lot bigger than a traditional backpack and is reasonably priced. See this post for full explanation.


USE ZIPLOC BAGS! FOR ANYTHING that might leak, or for anything that would be wrecked if it got wet. Which pretty much means everything.
Because of that, you are going to want to have a box of THIS JUMBO size (affiliate link).


I categorized a bunch of the little items and then labeled a few different gallon-sized Ziploc bags with those categories. This helps keep things organized and user-friendly. For example: every pack has a gallon-sized Ziploc bag labeled “PERSONAL,” and that Ziploc has all the personal items like toothbrush, comb, deodorant, etc. Another bag is labeled “SURVIVAL” with more of the survival-type items like handwarmers, compass, emergency blanket, etc.

72-Hour Kits: A Printable Schedule to Actually Finish Them! If you are totally overwhelmed by putting together 72-hour emergency kits for your family, this website is gold! It provides a free printable, step-by-step, organized way to start and actually finish your family's 72-hour kits! -PlanForAwesome

Items for your personal bag

Teeth Bag

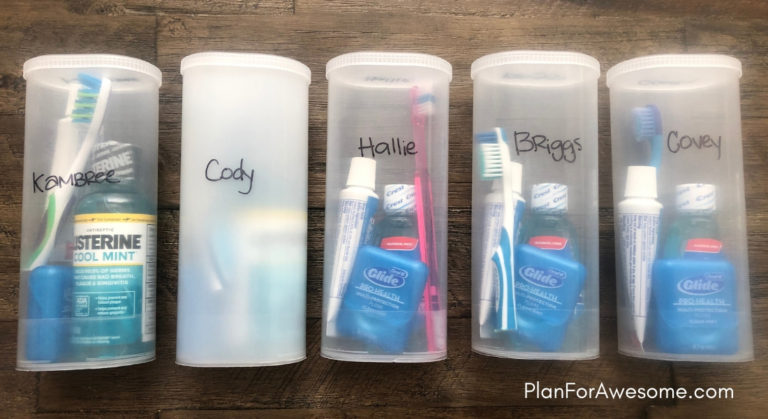
If you follow me, you already know how I like to pack everyone’s teeth stuff.  Read about it HERE. Regardless of how you choose to pack your teeth stuff, make sure you think about a place to keep it in between uses (don’t just pack the toothbrush in the packaging it came in, without having at the very least, a Ziploc bag to store it in once you’ve opened it and used it for the first time)

  • Toothbrush
  • Toothpaste
  • Floss or Flossers
  • Flouride

Hair Bag

  • Comb/Brush –  these amazing brushes (affiliate link) even come in a mini size and are CHEAP! Snag a couple normal-sized ones for your house and a few minis for your 72-hour kits, car, purse, etc. They are a bargain!
  • Ponytail holders
  • Bobby pins
  • Elastic headband
  • Dry shampoo

Medicine Bag

You can put this in your pack, or you could keep it in your First Aid Kit. These are just some basics to get you started.

Miscellaneous Bag

  • Disposable washcloths – like these (affiliate link)
  • Mini Kleenex pack (Dollar Store is the best place to find these – can’t beat 6 for $1)
  • Mini lotion
  • Contact solution and case
  • Spare glasses if you have them
  • Q-tips
  • Cotton balls
  • Make-up remover
  • Mirror
  • Razor
  • Nail file
  • Nail clippers (affiliate link)
  • Chapstick
  • Tweezers
  • Deodorant
  • Roll of toilet paper
  • Tampons/Pads
  • Pantiliners – these are a great way to extend the life of underwear in an emergency situation. If you find yourself needing to stretch your 72-hour kit longer than 72 hours, these would be really handy to help keep your underwear fresh! I’m just sayin’…
72-Hour Emergency Kits For Beginners - A Step-by-Step Guide - PART 2 - This is such an awesome post for putting together 72-hour emergency kits for adults! There's even a free printable checklist, expiration date tracker, and explanations of everything.

Survival Bag

  • Work gloves – nothing fancy – here is a link to the ones I got (affiliate link). There are 12 pair, making them each just a little over $2 a pair.
  • Bandana – here is a link to a dozen cheap bandanas (affiliate link) – they are less than $1 a piece.
  • Ponchos (affiliate link) – I go cheap on these ($2 a piece).  The nicer ones are bulky, and space is at a premium here. However, I do think it’s worth getting the ones with sleeves and a drawstring around the hood. This set has 4 adult and 4 kid ponchos.
  • Survival blanket (affiliate link)- is SO much better than the little foil blankets you think of when you hear “emergency blanket.” These combine the quality of reflecting body heat with the durability of a thicker, tougher blanket.
  • Emergency Sleeping Bag – this 2-pack is a great price! I love that this is already in a bag shape. Even if you have sleeping bags, these can be used as liners to provide extra warmth.
  • Handwarmers and toe warmers – (affiliate links) these 40-packs are the best value for sure!  I have 5 packs of each in each person’s survival bag
  • Compass/Whistle/Mirror/Waterproof Match Holder/Fire Starter/Necklace Thing (affiliate link) – This thing is awesome.  We all have one in our survival bags.
    • It is a whistle, a compass, a reflection tool, a fire-starter, and a place to keep matches dry, all in one.  Don’t forget to put a few matches in each one before packing it away!
    • Notice the money-saving 3-pack.  Or heck!  If you buy 30 of them they are dirt cheap.  Stocking stuffers…??
  • Pepper Spray (affiliate link) – not only for protection from people, but also animals
  • Stormproof matches (affiliate link)
  • Lighter
  • Duct Tape (affiliate link)
  • Masking Tape
  • Packing Tape
  • Super Glue (these singles are great for one-time use) – (affiliate link) in fact, this is the only way I buy Super Glue now. That way the lid doesn’t glue itself shut. Just open it, use it, and throw it away. Get a fresh one the next time you need Super Glue. Genius!
  • Zip Ties (affiliate link)
  • Twist Ties
  • Screwdrivers (affiliate link) – to open battery compartments on anything that requires batteries in your pack. Make sure you get the appropriate tips that you’ll need. This set (affiliate link) should cover you unless you need large tips.
  • Scissors – I love the Scotch ones that go on coupon every once in a while at Costco. They are really good scissors and a great price!
  • 2 draw-string trash bags (just our kitchen ones)
  • Tube Tent (affiliate link) – this is not a tent in the sense that you know. I was actually really disappointed when I got it. It looks like a mylar blanket. There is no shape to it whatsoever. However, upon figuring out how to use the thing, my opinion changed, and I now think it is genius. It has no shape, so it can roll up to take up hardly any space at all. It comes with a cord that you feed through the tube, and then attach to two sturdy objects (like trees, cars, etc). Then you secure the sides to the ground, and you have a highly functional “tent.” (It is a tube tent, so it is open on both ends). For the amount of space this takes up, it is amazing. I can’t say I have used it, but it got amazing reviews from people who use stuff like this. I feel better knowing that we have this as a last resort. Maybe not even to sleep in, but just as a place to put all of our stuff if we are sleeping in the car. It could have multiple uses, and for $20, I decided to include these in our kits. ***Since this tent does not come with instructions, I have included a printable with instructions for it. Print it out and stick it in the pouch of your tent(s) so you aren’t left wondering what the heck to do with it!*** ***NOTE: this link (affiliate link) should link to the tent, but there are several options on this page, many of which, are sleeping bags. Make sure you have the TENT selected!)***
  • Nails/stakes to secure tent/tarps (pack inside tent case/with tarps)
  • N95 Mask – I could do a whole post on masks.  These (affiliate link) are very basic, but good to have (definitely not comprehensive). They filter particulates that are harmful to breathe in.  During the Campfire in Paradise, CA, these masks were sold out for hundreds of miles. Amazon was sold out. Everywhere was sold out. We weren’t anywhere near Paradise, but we should have been wearing these every time we went outside for a couple of the really bad days. Moral of the story: once you realize you need these, it might be too late to get them. They are cheap. Order them now so you have them if needed. **The masks that don’t have the N95 rating do virtually nothing for something like the smoke we saw from Campfire.**
    • This 10-pack (affiliate link) makes them each about $1.50
    • This 20-pack (affiliate link) makes them less than $1 a piece
    • ***UPDATE***For some reason those N-95 masks have jumped a TON in price. But here is a link (affiliate link) for some that are more the price range that the 3M ones were when I posted this. These are still N-95 masks (affiliate link) with an exhalation valve – just a different brand!
  • Pocket Knife
72-Hour Emergency Kits For Beginners - A Step-by-Step Guide - PART 2 - This is such an awesome post for putting together 72-hour emergency kits for adults! There's even a free printable checklist, expiration date tracker, and explanations of everything.

Clothing Bag

A couple notes on clothing:


  1. If there is something you never wear, pack that!  You don’t need to go buy new clothes – who cares what you look like?  You’re alive!!!!
  2. If you only have room for either pants or shorts, or either long sleeve or short sleeve shirts, go with the long.  You can always cut off jeans and make them shorts and cut off long sleeves to make them short sleeves.
  3. I’ll mention this again on the 72-Hour Emergency Kits for KIDS post, but something to consider is getting your entire family matching bright colored shirts/sweatshirts (Walmart). That would make it easy to find each other if you are evacuated to a crowded shelter.

This is when those JUMBO Ziplocs (affiliate link) come in handy…

72-Hour Emergency Kits For Beginners - A Step-by-Step Guide - PART 2 - This is such an awesome post for putting together 72-hour emergency kits for adults! There's even a free printable checklist, expiration date tracker, and explanations of everything.

Random Bag

  • List (laminated or folded up and put in a ziploc bag) of addresses/phone numbers/safe places, in case cell phones aren’t working (You could even use the Family Emergency Plan printable in Emergency Preparedness Step 7)
  • Pictures of each family member, in case separated (laminated is great, or at least in a ziploc bag)
  • Copies of ID (License), Social Security Card, Passport, Military ID, etc.
  • Copy of IMPORTANT INFO – if you have been following me for a while, you have already done this. It is Emergency Preparedness Step 5. If you haven’t done this, don’t let it slow you down right now. Focus on getting the rest of this pack together, and then make your Important Info document and stick it in later. The good news is, this one is FREE! 🙂
  • Checkbook
  • Cash – Be sure to include small bills/quarters for vending machines, as well as larger bills in case power is out and ATM machines aren’t working.
  • Calling card – Yes, they still exist. I googled it! Having said that, I probably wouldn’t go out and get one today if I didn’t have one from 10 years ago in my pack already…but since it’s in my pack, I thought I would mention it.
  • Maps (affiliate link) – you may think you know your way around, but the well-known roads may be closed. If cell towers are knocked out, you won’t be able to rely on GPS. So having some good old-fashioned maps is not a bad idea. Here are some different types of maps to consider including in your pack:
    • City
    • County
    • State (affiliate link)
    • Fire Road Maps/Forest Service
    • Photo Maps – these show things like water sources (like a Google Earth shot)
    • This one (affiliate link) is a really good one to have.
    • PS – I went to the California Welcome Center in my area and it was a goldmine of all the maps I wanted – and they were all FREE!
  • Mini fan plus batteries
  • Sewing Kit (affiliate link) – nothing fancy
  • Safety Pins
  • Scriptures/Hymn book
  • Notebooks/Pens
  • Paperclips
  • Rubberbands
  • Book
  • UNO
  • Dice/Yahtzee – click here for free printable Yahtzee Scorecards
  • Playing Cards
72-Hour Emergency Kits For Beginners - A Step-by-Step Guide - PART 2 - This is such an awesome post for putting together 72-hour emergency kits for adults! There's even a free printable checklist, expiration date tracker, and explanations of everything.

Loose Items

Side Pockets

  • Water bottle
  • Hand sanitizer
  • Flashlight/batteries

Main Pocket

  • Comfort food (favorite nonperishable snack) – If you are able to fit your food in your pack, then this could just go with the rest of the food. If you are packing food in a separate bag, I would still recommend having SOMETHING in your pack. Granola bars are great, and so are a bunch of freeze-dried snacks from THIS COMPANY (affiliate link). The Snackies are great, as well as pantry cans of freeze-dried fruits, yogurt bites, etc. Most of these items have a shelf life of 25 years, so they would require very little rotating. And they taste AMAZING! Pomegranate Yogurt Bites are my absolute favorite. Each member of our family got to pick one freeze-dried fruit/snack to put in their pack. I love this option because I don’t have to rotate them! **NOTE: the Snackies Pouches and Snackies Singles have a much shorter shelf life than the pantry cans (most of the Snackies are more like 2 years as opposed to 25 years). So I went with pantry cans, to avoid rotating.
  • Water Pouches (affiliate link) – Believe it or not, water expires. And water bottles aren’t the most convenient shape to pack when space is of the essence. So while I do have traditional water bottles in the side pockets of our packs, I also have these water pouches stuffed in every nook and cranny inside the pack. Water is essential to survival and is often the number one priority of relief efforts of FEMA and Red Cross when responding to a disaster. I was happy to spend the money to get these water pouches, to add any additional water I could to each pack! The more you buy, the more you save. We have a large family so I bought the biggest pack, which was 128 pouches for $46.16, which makes them $.36 each. Not a bad price at all. If you don’t want that many, consider buying them in bulk anyway, and splitting them with someone else!
  • Tarps – would be nice to lay down on the ground at a shelter to put items on, to sit on, etc.
72-Hour Emergency Kits For Beginners - A Step-by-Step Guide - PART 2 - This is such an awesome post for putting together 72-hour emergency kits for adults! There's even a free printable checklist, expiration date tracker, and explanations of everything.

5-Gallon bucket/toilet

  • 5-gallon bucket with toilet seat – this one is a good price and has a funny name :). Here are the sanitation bags to go with it.
  • Toilet paper
  • Sanitation bags (this link is a good, cheap option – it has the bucket, liners, toilet seat, plus a couple other things.  It’s the same one I recommended for the Classroom Lockdown Kit)
  • This pop-up pod is really awesome for privacy should the need for a bucket toilet ever arise.
  • Crank flashlight/radio (affiliate link) – this is the one we have and we are happy with it. The radio works, the flashlight works, it has a battery, solar, AND a crank-powered option. It also has a USB port to charge electronics. We have not tested the solar function but have tested everything else and it all works. This is certainly not necessarily THE ONE I would recommend; there are countless options of flashlights, radios, chargers, etc. This one is 8 years old, so I’m sure there are better ones out there now!
  • Phone Charger(s) – write this on your expiration list, not because it expires, but because if you change phones, your charger might change, so it’s a good reminder to update the charger when you are rotating expired things.
  • Water bottle filtration – We have a couple Lifestraws (affiliate link) – after researching a bunch of different options, I like these because they are small and can filter a lot of water for how small they are. They are also highly effective, filtering out almost anything you would ever need to worry about. Notice I said “almost everything.” Still not 100%, but dang close!
  • Wipes – these aren’t just for babies! Wipes are SO HANDY to have regardless of how old you are!
  • Sunscreen
  • Clorox wipes
  • Handsoap
  • Ziploc bags
  • Trash bags
  • Paper towels
  • 50′ Nylon Rope
  • Nails/stakes to secure tarps
  • Lantern (affiliate link) with batteries – I like these lanterns because they are fairly compact and weather-resistant, and at 2 for $14.99, you can’t beat the price. They have a magnetic bottom, allowing you to stick it to anything magnetic (like the hood of your car). They also have a hook so you can hang them (from a loop inside your tent, or in your car, or from a tree, etc). **Don’t forget to pack the correct type and amount of batteries in a ziploc bag!**
  • Walkie talkies (plus batteries)
  • Barf Bags – these or these (affiliate links) are kinda fun…if you get a big pack, put some in your car for road trips
  • Corded Phone (affiliate link)
  • Shovel (affiliate link) – we splurged and got this one for $35. It is super compact, but attaches in just a few seconds to have a more usable length of a handle. It also has several other tools built in This comes with an instruction sheet inside the carrying case, so no additional instructions are needed.
72-Hour Emergency Kits For Beginners - A Step-by-Step Guide - PART 2 - This is such an awesome post for putting together 72-hour emergency kits for adults! There's even a free printable checklist, expiration date tracker, and explanations of everything.

Food

These are just ideas. You know you and how much you eat and what you like. A few things to consider:

  • The lighter the food, the better
  • The more compact the food, the better
  • The higher in protein the food, the better
  • You will need a can opener if you pack any sort of cans (unless they are all pop-top cans)
  • If you pack food that requires water, make sure you account for all of that water in your calculations of how much water you need.
  • If you pack food that requires boiling water, you will need a pot, as well as a heat source

Easy but Heavy

  • Canned soup
  • Canned tuna
  • Spaghettios with meatballs
  • Fruit Cocktail
  • Canned peaches
  • Canned corn

Light but requires heated water

Snacks

  • Granola bars
  • Beef jerky
  • Fruit snacks
  • Suckers
  • Smarties
  • Gum
72-Hour Emergency Kits For Beginners - A Step-by-Step Guide - PART 2 - This is such an awesome post for putting together 72-hour emergency kits for adults! There's even a free printable checklist, expiration date tracker, and explanations of everything.

Food accessories

  • CAN OPENER! (affiliate link) – this is my favorite can opener. It doesn’t go dull after a month, and it does a smooth, clean job. I am confident this will last well past 72 hours! I actually have a couple of these in my long-term food storage as well.
  • Disposable pads/placemats (affiliate link from Target) or these are the same ones (affiliate link from Amazon) – a clean surface to put food on, etc.
  • Paper plates and bowls
  • Plastic utensils to cook and eat with
  • Camping Stove (affiliate link) – This is the one we got. Very reasonably priced and easy to use. However, I was not able to order the butane (fuel canisters) on Amazon because they wouldn’t deliver it to my address. So we just got our fuel at a physical store. Note: you should not use a butane stove indoors. The fumes can cause carbon monoxide poisoning. Always use these outside!
  • Fuel for camping stove (the type of fuel will depend on the type of stove)
  • THESE little cans of fuel are AWESOME (affiliate links) because you can use them inside (here is another brand, so you can compare prices on Amazon). You can purchase a foldable stove (affiliate link) for $10, and then use canned heat with the foldable stove. If you are only going to get one type of stove, I would suggest this. The downside is, it isn’t as powerful as a butane stove is, so canned heat isn’t ideal to actually COOK foods. But most emergency foods will just need to be heated up (like a can of soup) or require boiling water (which this will do). So for a 72-hour kit, these are perfect.
  • A pot (or pots), or some way to heat water to make the camping food – I used an old pot that we had in our kitchen cupboard. They do sell compact camping pots (affiliate link) that would be convenient if you are going to purchase one for this purpose. I just preferred to use one that we already had for free.
  • Aluminum foil
  • Dishwashing soap (mini)
  • Hot pads

Water

You should have one gallon per person per day. 

  • I mentioned the water pouches (affiliate link) up above. These are good for squeezing into little dead space in your pack. As convenient as they are, it would take 31 of these pouches to equal one gallon of water. So you would need almost 100 pouches per person to have the recommended amount of water.
  • We get our bottled water at Costco. A case of water is 40 bottles, and each bottle has 16.9 fluid ounces. That is 676 ounces in one case of water (Kirkland brand). This amounts to 5.28 gallons of water. So one case is more than enough for one person. While this doesn’t fit in a backpack, it is easy to grab and go, and can be used for drinking, cooking, and bathing if needed. This is also a much cheaper option for storing water than the pouches.
  • We have some of both. We keep flats of water on-hand with our packs, but also have water pouches crammed in between things in our packs. That way if we have to ditch the cases of water, at least we have something in our packs on our backs.

Sleeping Stuff

  • Sleeping bag (you may want to put this on your Grab List which is covered in Part 5, depending on if you’d like to permanently store your sleeping bags with your 72-hour kits, or if they typically have a different place with your camping gear)
  • Sleeping pad – same as sleeping bag
  • Pillow – same

Pep talk and more help for emergency kits for adults

Remember: YOU GOT THIS! 


Take it in chunks.  Don’t give up.  Take one section of the list at a time and chip away at it as time and money allow. 


ALSO REMEMBER that this is YOUR KIT.  Add to this list, cross things off this list, and make it YOURS!


If you’re wanting more handholding, check out my Personalized Preparedness Membership.


For more help with 72-Hour Emergency Kits, see the following posts:


Part 1 – 72-Hour Kits for Beginners – this has all the general tips, tricks, and things to think about before beginning to put your kits together.

Part 2 – 72-Hour Kits for ADULTS – this is the page you are on right now.

Part 3 – 72-hour kits for KIDS / BABIES

Part 4 – 72-Hour Emergency Kits for Pets 

Part 5 – 72-Hour Emergency Kit GRAB LIST

Part 6 – A 16-Week Schedule to Actually Finish Your Family’s 72-Hour Kits

Part 7 – DIY First Aid Kit for Families


Related Posts:

hands holding a sign.

5 simple things you can do to get your family prepared if you don't have thousands of dollars or hundreds of hours

Receive EXCLUSIVE SUBSCRIBER-ONLY FREE PRINTABLES, INCLUDING "THIS OR THAT EMERGENCY PREPAREDNESS," with 5 things that take 15 minutes or less!

hands holding a sign.

This website uses cookies to ensure you get the best experience.